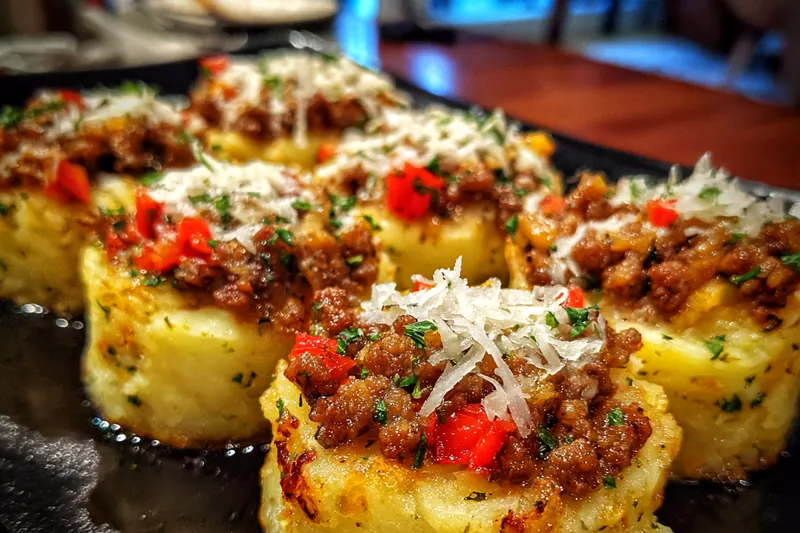
Delicious Mashed Potato Nests
Delicious Mashed Potato Nests are a delightful twist on traditional mashed potatoes. These crispy, golden nests are perfect for serving as appetizers at any gathering. With a creamy center and a hint of cheese, they are a crowd-pleaser. Easy to prepare and fun to eat, these nests will surely impress your guests!


Why This Delicious Mashed Potato Nests Recipe Works
This recipe combines classic mashed potatoes with an innovative presentation that makes them ideal for entertaining. The nests are not only visually appealing but also offer a delightful contrast in textures with their crispy exteriors. The addition of cheese and sour cream elevates the flavor, making them irresistible.
The technique of shaping the nests allows for a perfect balance of potato and filling. Frying them to golden perfection enhances the overall experience, ensuring each bite is satisfying and full of flavor. This method helps achieve a beautiful presentation while delivering a comforting taste.
💡 Professional Tip
For the best results, choose starchy potatoes like Russets, as they yield creamier mashed potatoes. Ensure the mixture is well-seasoned before frying, and don’t overcrowd the skillet to avoid steaming rather than frying the nests.
Frequently Asked Questions
Yes, you can prepare the nests ahead of time. Form and fill the nests, then cover and refrigerate them for up to a day before frying. When ready to serve, just fry them as directed. This makes for a convenient appetizer option for parties.
You can substitute sour cream with Greek yogurt for a healthier option, or use cream cheese for a richer flavor. Both alternatives will maintain the creaminess and texture of the dish.
The nests are done when they are golden brown and crispy on the outside. You can check the underside by gently lifting one with a spatula. If it’s a deep golden color, it's time to flip or remove them from the skillet.
Yes, you can freeze the prepared nests before frying. Place them in a single layer on a baking sheet, freeze until solid, then transfer them to a freezer bag. When ready to use, fry them directly from frozen, adding a few extra minutes to the cooking time.
These nests pair wonderfully with dipping sauces like ranch, garlic aioli, or even a spicy sriracha mayo. They also complement main dishes such as grilled chicken or steak, making them a versatile addition to any meal.
Cooked mashed potato nests can be stored in the fridge for up to 3 days. Store them in an airtight container to keep them fresh. Reheat in the oven for best results.
Yes, you can make the mashed potato mixture in advance and store it in the fridge. Form the nests and fry them just before serving for the best texture and flavor.
The best way to reheat the nests is in the oven at 350°F (175°C) for about 10-15 minutes until heated through and crispy again. Avoid using the microwave, as it may make them soggy.
Recipe Troubleshooting Guide
Too Dry
Problem: The mashed potato nests can end up too dry if they contain insufficient moisture.
Solution: If the nests are dry, try adding a little more milk or butter to the potato mixture next time. Adjusting the seasoning can also enhance the flavor.
Not Crispy Enough
Problem: Sometimes the nests may not get crispy while frying.
Solution: Ensure the oil is hot enough before adding the nests. Also, avoid overcrowding the pan, which can cause steaming instead of frying. Fry in batches if necessary.
Overcooked
Problem: Overcooking can lead to burnt or overly dry nests.
Prevention: To prevent overcooking, keep an eye on the nests as they fry and flip them as soon as they turn golden brown. A lower frying temperature can help control the cooking process.
Undercooked Center
Problem: The nests may have a raw center if they are too thick.
Recovery: Ensure that the nests are not too thick when shaped. If they come out undercooked, you can return them to the skillet for a few more minutes until fully cooked.
Burnt Exterior
Problem: If the nests have burnt exteriors, it may indicate too high a frying temperature.
Prevention: Reduce the heat and fry the nests more slowly to allow the inside to cook without burning the outside.
Flavor Balance
Too Sweet: If the nests taste too sweet, consider adding more salt and seasoning to balance the flavors.
Too Salty: For nests that are too salty, serve with a rich, creamy dip to balance the sodium content.
Bland: If the nests are bland, enhance the flavor with additional spices, herbs, or a sprinkle of cheese on top before serving.

Essential Ingredients for Delicious Mashed Potato Nests
The key ingredients for these nests include russet potatoes, which provide the perfect base for a creamy texture. Cheese adds richness and flavor, while sour cream lends a tangy touch. Eggs help bind the mixture, maintaining the shape of the nests during frying.
Using high-quality ingredients can elevate your dish significantly. Opt for fresh, organic potatoes and quality cheese for the best results. The freshness of your ingredients will enhance the overall flavor of the nests.
Essential Ingredient Notes
- Russet Potatoes: Russet potatoes are starchy and perfect for mashing, resulting in a creamy texture. Look for potatoes that are firm and free of blemishes for the best flavor.
- Cheddar Cheese: Use sharp cheddar cheese for a more robust flavor in your nests. Grate it fresh for the best melting quality and taste.
- Sour Cream: Sour cream adds a delightful creaminess and tang to the nests. For a twist, consider using flavored sour cream or yogurt for additional taste.
Step-by-Step Cooking Process
Creating these mashed potato nests involves simple steps that lead to impressive results. Start by boiling the potatoes until tender, then mash them with flavorful ingredients. The shaping process allows for creativity, making each nest unique. Frying them brings out a golden crispiness that completes the dish.
To achieve the perfect nests, ensure the oil is hot enough before frying. This helps maintain the shape and texture. Keep an eye on them as they cook for even browning and a delightful crunch.
Key Technique for Perfect Delicious Mashed Potato Nests
The most important technique for achieving the perfect mashed potato nests is in the frying process. Ensure the oil is at the right temperature to create a beautiful golden crust while keeping the inside creamy. The shaping of the nests is equally crucial; the right thickness allows for even cooking.
Delicious Mashed Potato Nests
📋 Ingredients
Main Ingredients
- 1 cup butterRoom temperature
- 1/4 cup heavy creamFor drizzling
- 1 tsp garlic powderOptional seasoning
- Salt and pepperTo taste
- 1 tsp fresh herbsChopped, for garnish
For the Sauce
- 2 lbs russet potatoesPeeled and cubed
- 1/2 cup milkFor mashing
- 1/4 cup butterMelted
- 1/2 cup shredded cheddar cheeseFor flavor
- 1/4 cup sour creamAdds creaminess
- 1/2 tsp garlic powderEnhances flavor
- 1/2 tsp onion powderAdds depth
- Salt and pepperTo taste
Instructions
Boil Potatoes
In a large pot, add cubed potatoes and cover with water. Bring to a boil and cook until tender, about 15-20 minutes.
Mash Potatoes
Drain potatoes and return to pot. Add milk, butter, garlic powder, onion powder, salt, and pepper. Mash until smooth and creamy.
Mix in Cheese and Sour Cream
Stir in shredded cheddar cheese and sour cream until well combined.
Shape Nests
Allow the potato mixture to cool slightly. Using your hands, form small nests in a muffin tin, pressing down in the center to create a well.
Prepare Eggs and Breadcrumbs
In a bowl, combine beaten eggs with breadcrumbs and set aside.
Fill Nests
Fill each potato nest with the remaining potato mixture and sprinkle with the breadcrumb mixture on top.
Fry Nests
Heat oil in a skillet over medium heat. Carefully place nests in the skillet and fry until golden brown, about 4-5 minutes per side.
Garnish and Serve
Remove nests and place on paper towels to drain excess oil. Garnish with chopped green onions and serve warm.
Recipe Notes & Tips
Storage Tips
To store leftover mashed potato nests, place them in an airtight container and refrigerate for up to 3 days. Reheat in the oven to restore crispiness, as microwaving may make them soggy.
Serving Suggestions
Serve the nests warm, garnished with fresh herbs and alongside your favorite dipping sauces for an extra flavor boost. They make a great pairing with both meat and vegetarian dishes.
Recipe Variations
You can experiment with different cheese varieties such as mozzarella or pepper jack for a kick. Consider adding cooked bacon bits or herbs into the potato mixture for enhanced flavor.