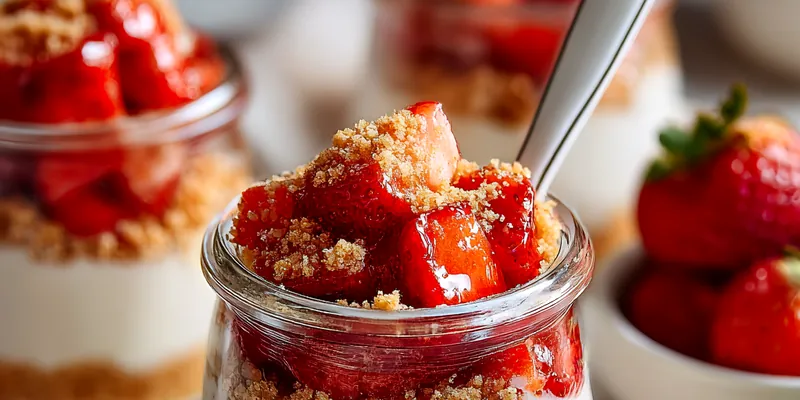
Layered Strawberry Cheesecake Jars
Layered Strawberry Cheesecake Jars are a delightful treat that combines the creamy goodness of cheesecake with the freshness of strawberries. These individual jars are perfect for entertaining or a sweet treat at home. They are easy to prepare and make for a beautiful presentation. Enjoy the perfect balance of textures and flavors in every bite!

Why This Layered Strawberry Cheesecake Jars Recipe Works
This recipe shines due to its simplicity and the fresh ingredients used. The combination of creamy cheesecake and juicy strawberries creates a delightful flavor contrast. Each layer is packed with taste, making each spoonful a pleasure. The individual jars also make for easy serving and sharing.
The technique of layering enhances both presentation and flavor. By allowing each layer to shine, you create a beautiful dessert that is as pleasing to the eye as it is to the palate. Chilling the jars allows the flavors to meld, resulting in a well-rounded dessert experience.
💡 Professional Tip
For the best results, use room temperature cream cheese to avoid lumps in your filling. Additionally, let the cheesecake jars chill for at least an hour to fully set and allow the flavors to develop. Fresh, ripe strawberries will enhance the overall taste of the dessert.
Frequently Asked Questions
Absolutely! These jars can be prepared a day in advance and stored in the refrigerator. This allows the flavors to meld beautifully. Just be sure to add any garnishes, like mint leaves or extra strawberries, right before serving to keep them fresh.
If you're looking for a lighter option, you can use Greek yogurt as a substitute for cream cheese, which will give you a similar tangy flavor. For a dairy-free alternative, try using vegan cream cheese or silken tofu blended until smooth. Keep in mind that this may slightly alter the texture.
While the jars are chilled rather than baked, you can ensure they are ready by checking the consistency of the cheesecake filling. It should be firm yet creamy, and the layers should hold together when the jars are removed from the refrigerator. If they feel too soft, allow them to chill longer.
Unfortunately, freezing is not recommended for these jars as the texture of the cheesecake and strawberries may change upon thawing. However, you can prepare the cheesecake filling in advance and freeze it, then assemble the jars fresh before serving.
These jars pair wonderfully with a variety of accompaniments. Consider serving them alongside a scoop of vanilla ice cream or a dollop of whipped cream for extra indulgence. A drizzle of chocolate sauce can also add a nice touch for chocolate lovers.
When stored properly in the refrigerator, the jars should last for about 3-5 days. Ensure that they are covered to maintain freshness. However, it's best to consume them within the first few days for optimal flavor and texture.
Yes, you can prepare these jars a few days in advance. Just make sure to keep them well covered in the refrigerator. This not only saves time but also enhances the flavors as they meld together, making for an even tastier dessert.
Since these jars are best served chilled, reheating isn't necessary or recommended. If they are stored in the fridge, simply allow them to sit at room temperature for about 15 minutes before serving for the best texture and flavor.
Recipe Troubleshooting Guide
Too Dry
Problem: Your cheesecake filling may have turned out dry.
Solution: Make sure to blend the filling until smooth and creamy, avoiding overmixing. Also, ensure the cream cheese is at room temperature for a creamier texture. Adding a bit more heavy cream can help retain moisture.
Not Crispy Enough
Problem: The graham cracker crust may not be crispy.
Solution: To achieve a crispier crust, ensure the butter is fully incorporated and use more crushed graham crackers. Baking the crust for 10 minutes before adding the filling can also enhance its texture.
Overcooked
Problem: The filling may have become too dense if overmixed.
Prevention: To prevent this, mix your ingredients on low speed and stop as soon as everything is incorporated. Avoid beating too vigorously to maintain a light texture.
Undercooked Center
Problem: If the cheesecake filling is too soft, it may not set properly.
Recovery: Ensure to chill the jars long enough in the refrigerator—ideally for at least 1 hour. If they are still too soft, let them sit longer until they firm up.
Burnt Exterior
Problem: The graham cracker crust may burn if baked too long.
Prevention: Keep an eye on the crust while baking, and remove it from the oven as soon as it turns golden brown. If you prefer no-bake, skip the baking step entirely.
Flavor Balance
Too Sweet: If the dessert is too sweet, add a pinch of salt or a squeeze of lemon juice to balance the flavors.
Too Salty: If it's too salty, consider adding a touch of sugar to counteract the saltiness.
Bland: For a bland taste, incorporate more vanilla extract or fresh lemon juice to elevate the flavor profile.
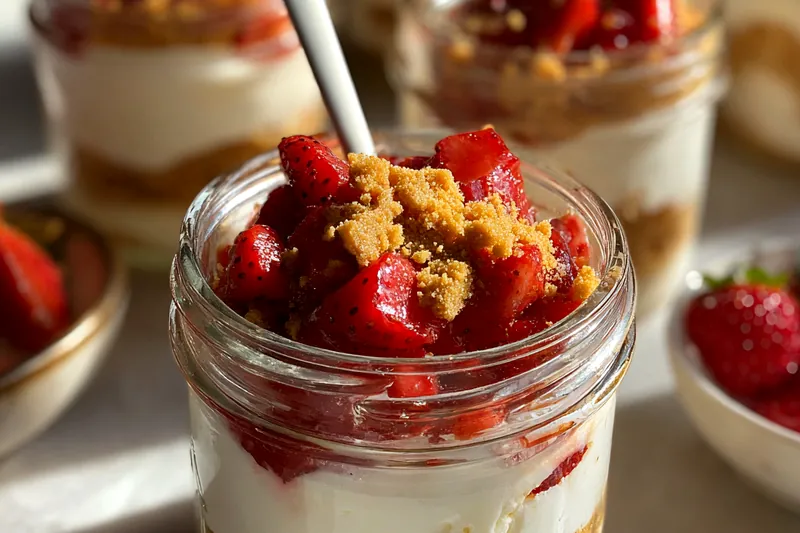
Essential Ingredients for Layered Strawberry Cheesecake Jars
The key ingredients include fresh strawberries, cream cheese, and graham crackers. Each plays a vital role in creating the delightful layers. The strawberries add a sweet and tart flavor, while the cream cheese provides a rich and creamy texture that balances perfectly.
Using high-quality ingredients is essential for the best results. Opt for fresh, ripe strawberries for maximum flavor, and always use full-fat cream cheese to ensure a creamy consistency. The graham crackers should be finely crushed to achieve a smooth and even crust.
Essential Ingredient Notes
- Fresh Strawberries: Choose strawberries that are bright red, firm, and free of blemishes. Fresh strawberries not only taste better but also add vibrant color to your dessert. Always wash and hull them just before use for the best flavor.
- Cream Cheese: Using room temperature cream cheese will help you achieve a smooth filling without lumps. Avoid low-fat versions, as they may compromise the creamy texture in your cheesecake.
- Graham Crackers: For the crust, use a brand that you enjoy the flavor of. Crushing them finely will ensure a well-formed crust that holds together well. Mixing with melted butter is key to binding them properly.
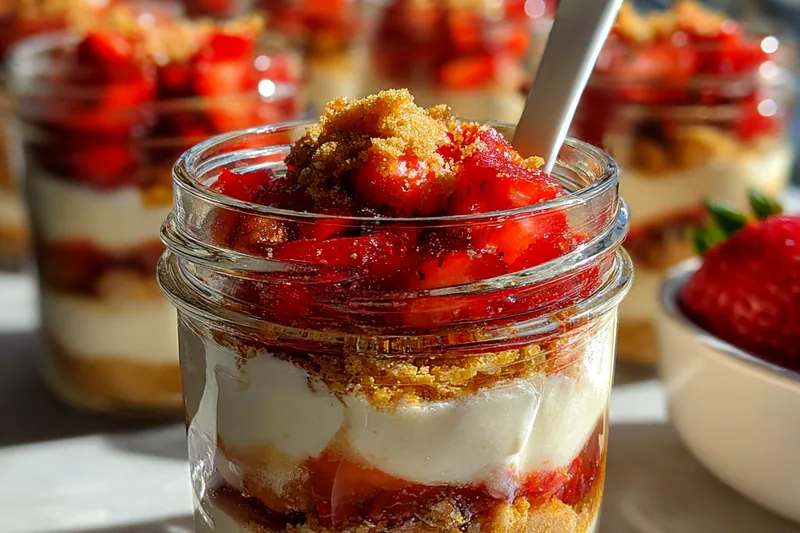
Step-by-Step Cooking Process
Creating Layered Strawberry Cheesecake Jars involves a few straightforward steps: preparing the crust, making the cheesecake filling, and layering the ingredients. Each step is simple and can be completed in under an hour, making this a quick and delightful dessert.
With careful layering and a bit of chilling time, you'll achieve a beautiful presentation that will impress your guests. The contrast of textures between the creamy filling and the fresh strawberries is what makes this dessert truly special.
Key Technique for Perfect Layered Strawberry Cheesecake Jars
The key to perfect Layered Strawberry Cheesecake Jars is in the layering technique. Start with a sturdy base of graham cracker crust, followed by a smooth filling, and finish with fresh strawberries. Allowing the jars to chill properly will help the layers set beautifully.
Layered Strawberry Cheesecake Jars
📋 Ingredients
Main Ingredients
- 1 cup butterRoom temperature
- 1 cup sugarGranulated
- 1 cup heavy creamWhipping cream
- 1/4 cup strawberry pureeFor drizzling
- 1 tbsp lemon juiceFreshly squeezed
For the Sauce
- 2 cups crushed graham crackersFor the crust
- 1/2 cup unsalted butterMelted
- 16 oz cream cheeseSoftened
- 1 cup powdered sugarFor sweetness
- 1 tsp vanilla extractFor flavor
- 1 cup heavy whipping creamFor the filling
- 1 lb fresh strawberriesHulled and sliced
- 1/4 cup granulated sugarFor sweetening strawberries
Instructions
Prepare the Crust
In a bowl, mix crushed graham crackers and melted butter until well combined. Press the mixture into the bottom of each jar to form a crust.
Make the Cheesecake Filling
In a mixing bowl, beat the softened cream cheese until smooth. Add powdered sugar and vanilla extract, and mix until fully combined.
Whip the Cream
In a separate bowl, whip the heavy cream until stiff peaks form. Gently fold the whipped cream into the cream cheese mixture until combined.
Prepare the Strawberries
In another bowl, combine the sliced strawberries, granulated sugar, and lemon juice. Let them sit for about 10 minutes to release their juices.
Layer the Ingredients
In each jar, add a layer of the cheesecake filling, followed by a layer of the strawberry mixture. Repeat the layers until the jars are filled.
Prepare the Strawberry Sauce
In a small saucepan, combine the cornstarch, water, and strawberry puree. Cook over medium heat until thickened, then cool slightly.
Top the Jars
Drizzle the strawberry sauce over the top of each jar. Garnish with fresh mint leaves and extra strawberries.
Chill and Serve
Refrigerate the jars for at least 30 minutes before serving to allow flavors to meld. Enjoy your delicious layered dessert!
Recipe Notes & Tips
Storage Tips
Store your Layered Strawberry Cheesecake Jars in the refrigerator, covered with plastic wrap or a lid. They will keep well for 3-5 days, but for the best taste and texture, consume them within the first few days after assembling.
Serving Suggestions
Serve these jars chilled for the best experience. Pair them with a scoop of ice cream or whipped cream for extra indulgence. A sprinkle of graham cracker crumbs on top can also add a nice crunch.
Recipe Variations
You can customize these jars by using different fruits like blueberries, raspberries, or peaches instead of strawberries. Additionally, consider adding a layer of lemon curd or chocolate sauce for a unique twist on the classic flavor.